Author Bio: Lesley Thompson
Lesley Thompson serves as the Vice President of Sustainability & Communications at Food Cycle Science. Her focus lies in spearheading sustainability initiatives, waste reduction strategies, and fostering strategic partnerships. Notably, she leads pioneering research efforts aimed at leveraging FoodCycler technology to decompose bioplastics and fats. With a steadfast commitment to environmental stewardship, Lesley drives impactful change within the organization and beyond. Outside of her professional endeavors, she is a dedicated parent and partner who loves music.
Introduction
Food Cycle Science™ has done extensive research on the value of Foodilizer™ as a supplement to compost and garden soil. This blog is a summary of our discoveries and recommendations for use of soil amendment generated by the FoodCycler® food waste recycler (or "Foodilizer"). Read on to learn how you can use Foodilizer as a key ingredient in a new compost pile.

Starting and Maintaining a backyard compost pile with Foodilizer
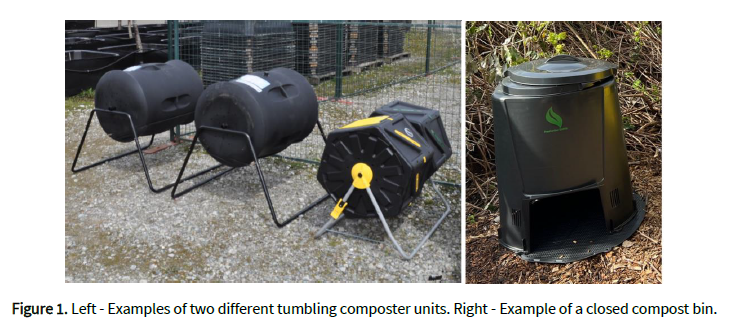
There are many options for compost bins available to household residents (Figure 1).1 Each option has unique characteristics and differs in the effectiveness of how they facilitate the degradation of food waste.
One of the common options across North America are closed compost bins (Figure 1, right image). These are commonly large pyramid-shaped bins with a volume of 250 - 310L (66 - 82 gallons) volumes. They typically have a plastic mesh that sits on the ground. Any leachate drains naturally through the plastic mesh into the ground underneath, and this mesh also provides access for soil invertebrates to populate the organic material inside. The side of the bin body may have grates at the bottom and top to provide passive aeration, and the lid can be rotated to provide additional venting. Such bins usually have a harvest door at the front that allows for compost retrieval. These bins have a lid which allows for manual mixing and aeration.
Another common option is tumbling composters (Figure 1, left image). These are closed bins that are suspended above the ground. Mixing and aeration are done by rotating (tumbling) the bin around its central axis. Tumbling composters usually have limited aeration and drainage capacities. The accumulation of moisture and lack of aeration means developing undesirable anaerobic environments is more likely. These conditions can cause offensive odours and less efficient degradation of food waste. The tumbling action promotes the formation of “balls” of compost. The centres of these balls are protected from contact with air, which creates anaerobic pockets that further contribute to the generation of offensive odours.
A powder-like material such as Foodilizer will more readily form compost balls, so tumbling composters are not advised. Closed bins that maintain contact between the compost and the soil work well and support an adequate environment for composting. Any bin with similar characteristics should perform well with the recipes presented here.
In our recipe development, we assume that household residents will set up a small compost pile (~120-200 L) to start and will make weekly additions of Foodilizer to keep the compost piles active for three months. The C:N ratio and moisture content are parameters that home composters can assess and control relatively easily and guidance will be provided on how to measure these parameters.
Optimal ranges for composting parameters:
Carbon to Nitrogen Ratio: 30:1 to 40:1
Moisture Content: 50 to 65%
Bulk Density: 300 to 475 kg/m3
Particle size: 4 mm to 75 mm
pH: 6 to 8
Oxygen Concentration: >10%
(Regenerative Waste Labs, 2023)

Home Composting Recipes and Considerations
Four compost recipes were devised to provide guidance for a household resident attempting to set up a compost pile to manage their Foodilizer. These recipes consider various feedstocks which may be accessible to residents and provide straightforward advice on how to maintain healthy compost piles. These recipes are adaptable to both composting vegetarian and non-vegetarian Foodilizer.
Setting up and monitoring a home compost pile using Foodilizer
Household residents starting a pile will need to ensure they have enough feedstocks to build a reasonably sized pile (~120 L). Having sufficient volume is crucial to ensure that there is enough biological activity to heat the pile. Starting with around ~2.25 kg of Foodilizer is recommended. Fresh or dry yard trimmings and leaves (i.e., the brown feedstocks) can be used to bulk up the pile and add carbon. We recommend advising residents to collect and store leaves during the fall to have this feedstock available year-round if enough space is available.
To get started with composting, residents will need a 5-gallon bucket (19 L), a watering can, the Foodilizer, and "brown" (carbon) feedstocks. The household should collect approximately 5 L, or 2.25 kg of Foodilizer and mix it with 30 L (8 gallons) of stable compost or soil, which acts as an inoculant. This material will introduce beneficial microbes to the compost pile.
📖 Inoculant: An inoculant, iin this case, is stable (finished) compost or soil that is added to a new compost pile to introduce beneficial microbes at the outset, thus setting up its microbiome for success. Inoculants only need to be added when setting up the pile.
The ratio of greens to browns is what ensures the compost has an optimal C:N. The below table provides four recipes based on either a vegetarian or meat-eater diet and based on the resident's available feedstocks. Values are provided in Litres (primary) and Gallons (secondary).

*The same volumes of inoculant (30L) and Foodilizer (5L) are used for all recipes. Inoculants only need to be added when setting up the pile. After adding 8 weeks worth of Foodilizer, the volumes of browns shown in the table should be added again to the pile.
You should create the pile by layering browns and the Foodilizer, spraying each layer with water before adding the next. Dry leaves or yard trimmings should be the last layer.
The table below shows this same recipes as a proportion of feedstocks if the household resident uses a compost bin with a different size than the one used in the above calculations. These volume ratios should be maintained regardless of the volumetric unit used.

The same ratio of inoculant and Foodilizer (6:1) is used for all recipes when starting the pile. It is not necessary to add more inoculant after setting up the pile. After the equivalent of 8 weeks of Foodilizer additions, additions of browns will be necessary. The volumes of browns shown in the table should be added again to the pile.
When adding cardboard or paper, you will need to ensure that the material doesn’t have any plastic layers or adhesive tape. It is necessary to avoid glossy paper and magazine paper, which have significant amounts of inks that may contain heavy metals. It is also important to shred the cardboard/paper into smaller pieces. Pieces do not need to be finely shredded. Strips with a width of 1.3 to 5 cm (0.5 and 2 inches) are sufficient.

After starting the pile, the weekly household production of Foodilizer can be added to the compost pile once weekly. The contents of the compost bin should be mixed and agitated to ensure airflow through the pile. Foodilizer can be added less frequently, but after the equivalent of eight weeks of material has been added, brown feedstocks will need to be added to the pile to maintain the optimal C:N ratio. The same volumes used to start the pile should be added. Additional feedstocks should be added in layers with water. Adding more inoculant is unnecessary.
Foodilizer can be added for up to three months (13 weeks). After this time, the compost should stabilize for at least 1-2 months before use.
📖 Stabilized Compost is essentially "finished" compost, whereby the pile contents are no longer actively decomposing.

Guidance for tracking compost parameters
The moisture level of the compost can be measured using the squeeze test. Take a handful of compost from below the surface and squeeze it. If water flows freely or there are visible drops of water, the compost is too wet, and more browns are needed (e.g., cardboard or newspaper). The moisture level is adequate if your hand comes away damp but with no pooling water or if the compost ball stays intact when lightly tapped. If the compost ball falls apart or a ball can't even be formed, the compost is too dry, and a little bit of water should be added.
A Note On Terminology:
The FoodCycler® is a countertop electric food waste recycler that breaks down food scraps through a mechanical process into a dry, lightweight by-product that can be used in gardening applications as a fertilizer or composted. The FoodCycler® and other electric food waste recyclers are not composters, nor do they produce compost or soil as they do not use additional microbes to break down food waste with bacteria. However, the term "electric composter" has been used to describe electric food waste recyclers.
References
Cornell.edu. (2024). Compost Chemistry - Cornell Composting. [online] Available at: https://compost.css.cornell.edu/chemistry.html [Accessed 16 May 2024].
Project Report, Regenerative Waste Labs: Recipe Development for Home and Municipal Composting of Foodilizer, June 2, 2023.